(561) 400-2205
It's the moment every homeowner dreads on a hot day: the AC suddenly goes silent, and the air starts to feel thick and warm. Before you panic and assume a costly repair is on the horizon, take a breath. More often than not, the culprit is something surprisingly simple you can fix yourself in just a few minutes.
Running through a few basic checks first can often save you the time, hassle, and expense of a service call. Let's walk through the most common issues I see in the field that homeowners can easily diagnose and resolve.
What to Check First When Your AC Stops Working
That sinking feeling when the cool air stops is all too familiar, but don't dial your HVAC technician just yet. I've been on countless service calls that were resolved in under five minutes with one of these simple checks. This is your first line of defense against an unnecessary bill.
Before you get into anything complicated, a quick walkthrough of the basics can often get your system humming again. Here is a simple checklist to get you started.
Quick DIY AC Troubleshooting Checklist
This table summarizes the first few things you should check when your AC stops working. Run through these in order before digging deeper or calling for help.
| Check Point | What to Look For | Potential Quick Fix |
|---|---|---|
| Thermostat | Blank screen, wrong mode, or incorrect temperature setting. | Replace batteries. Switch mode to 'Cool'. Set temp below room temp. |
| Circuit Breaker | A tripped breaker in the "off" or middle position. | Flip the breaker completely off, then back to "on". |
| Air Filter | A filter that looks gray, dusty, or is clogged with debris. | Replace the filter. For reusable ones, clean it per instructions. |
Now, let's break down each of these points in a little more detail.
Start with the Thermostat
The thermostat is the command center for your entire cooling system, and it's where most problems start. It’s almost a running joke in the industry how many "broken" ACs are just set up incorrectly.
First, make sure the system is actually set to 'cool'. If it's on 'heat' or just 'fan,' you won't get any relief from the heat. Next, look at the temperature setting. For the AC to kick on, the set temperature needs to be a few degrees lower than the current temperature in the room.
If the thermostat screen is completely blank, don't panic. It probably just needs new batteries. This is a super common issue, especially for models that aren't hardwired into your home's electrical system.
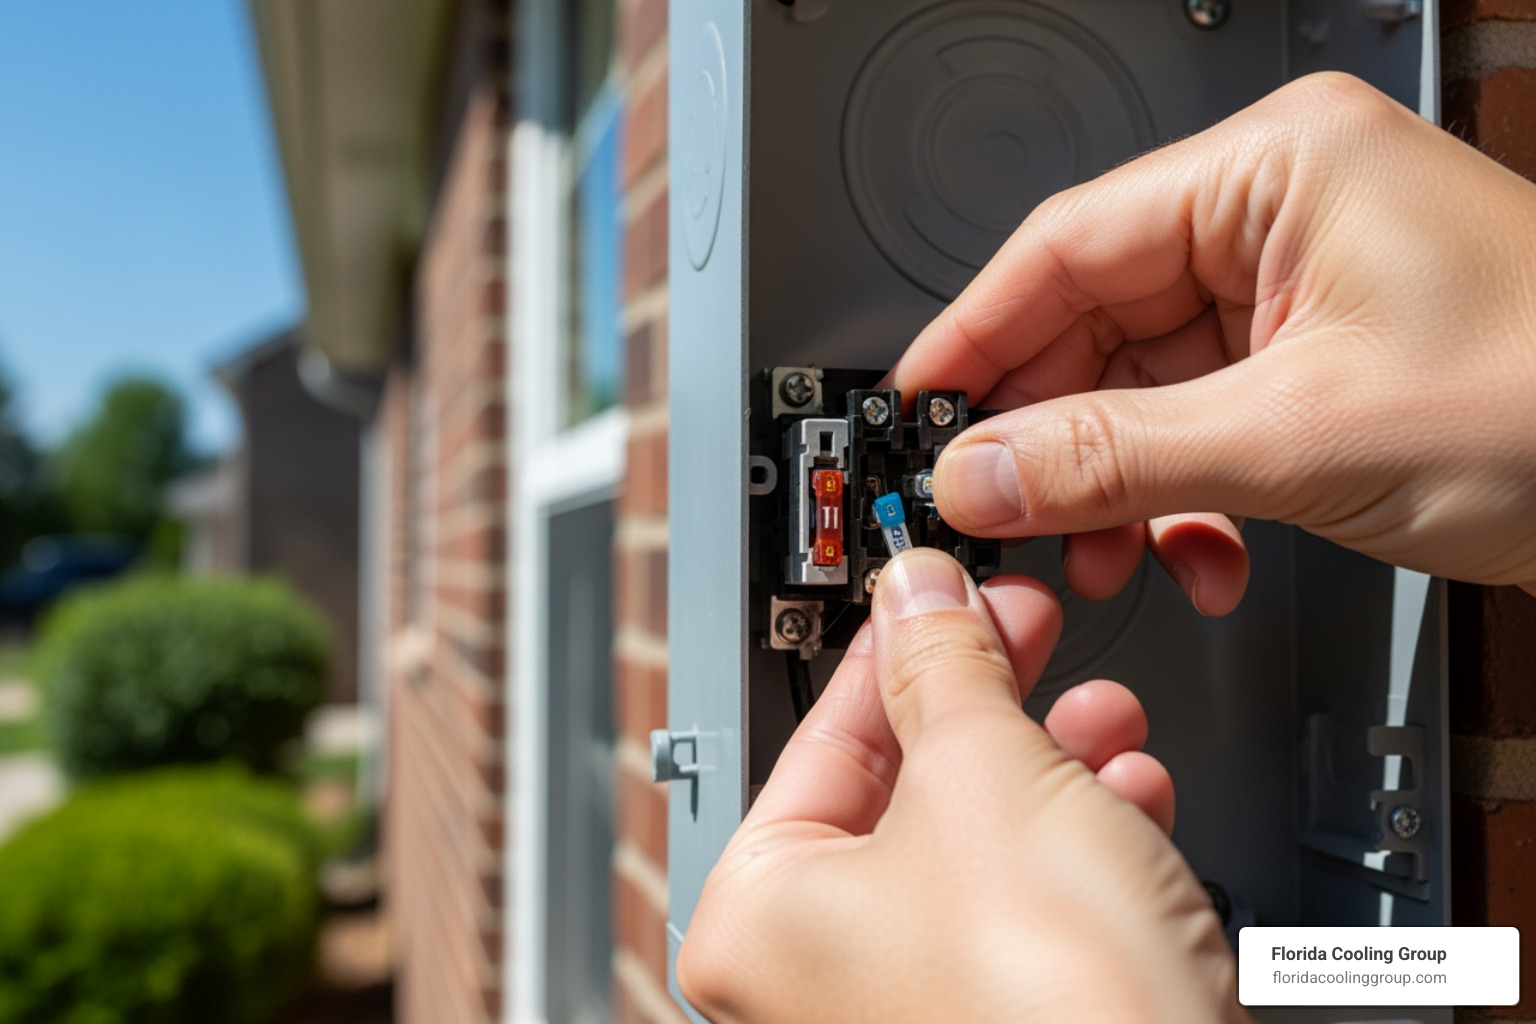
Check Your Circuit Breaker
Okay, so the thermostat looks fine. The next stop is your home's main electrical panel. An air conditioner pulls a lot of power, and it’s not uncommon for it to trip a breaker, especially when it first kicks on or during a storm.
Find your breaker box and look for the switch labeled "AC," "Air Handler," or something similar. If that switch is sitting in the middle or flipped to the "off" position, you've found your problem. To fix it, you have to push the switch all the way to "off" first, and then flip it firmly back to the "on" position.
A Quick Word of Warning: If the breaker trips again right away, leave it alone. Don't keep resetting it. This is a sign of a more serious electrical issue, and it's time to call in a pro.
This is the basic path you should follow when troubleshooting.
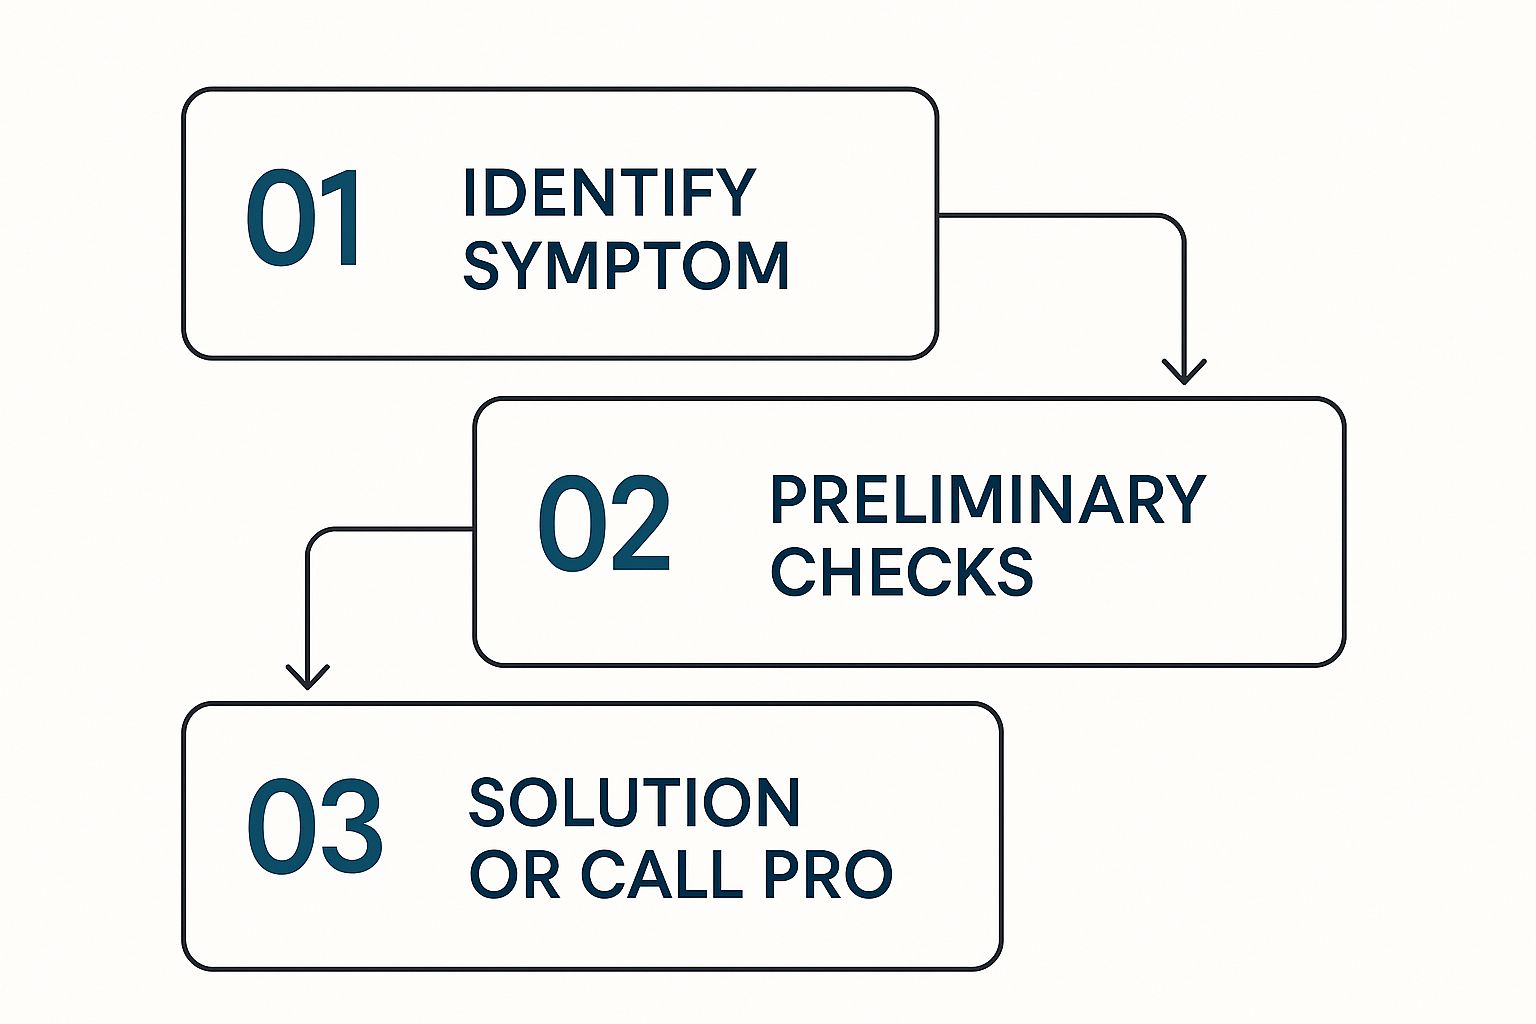
As you can see, figuring out what's wrong starts with these simple, foundational checks before you ever need to think about calling for backup.
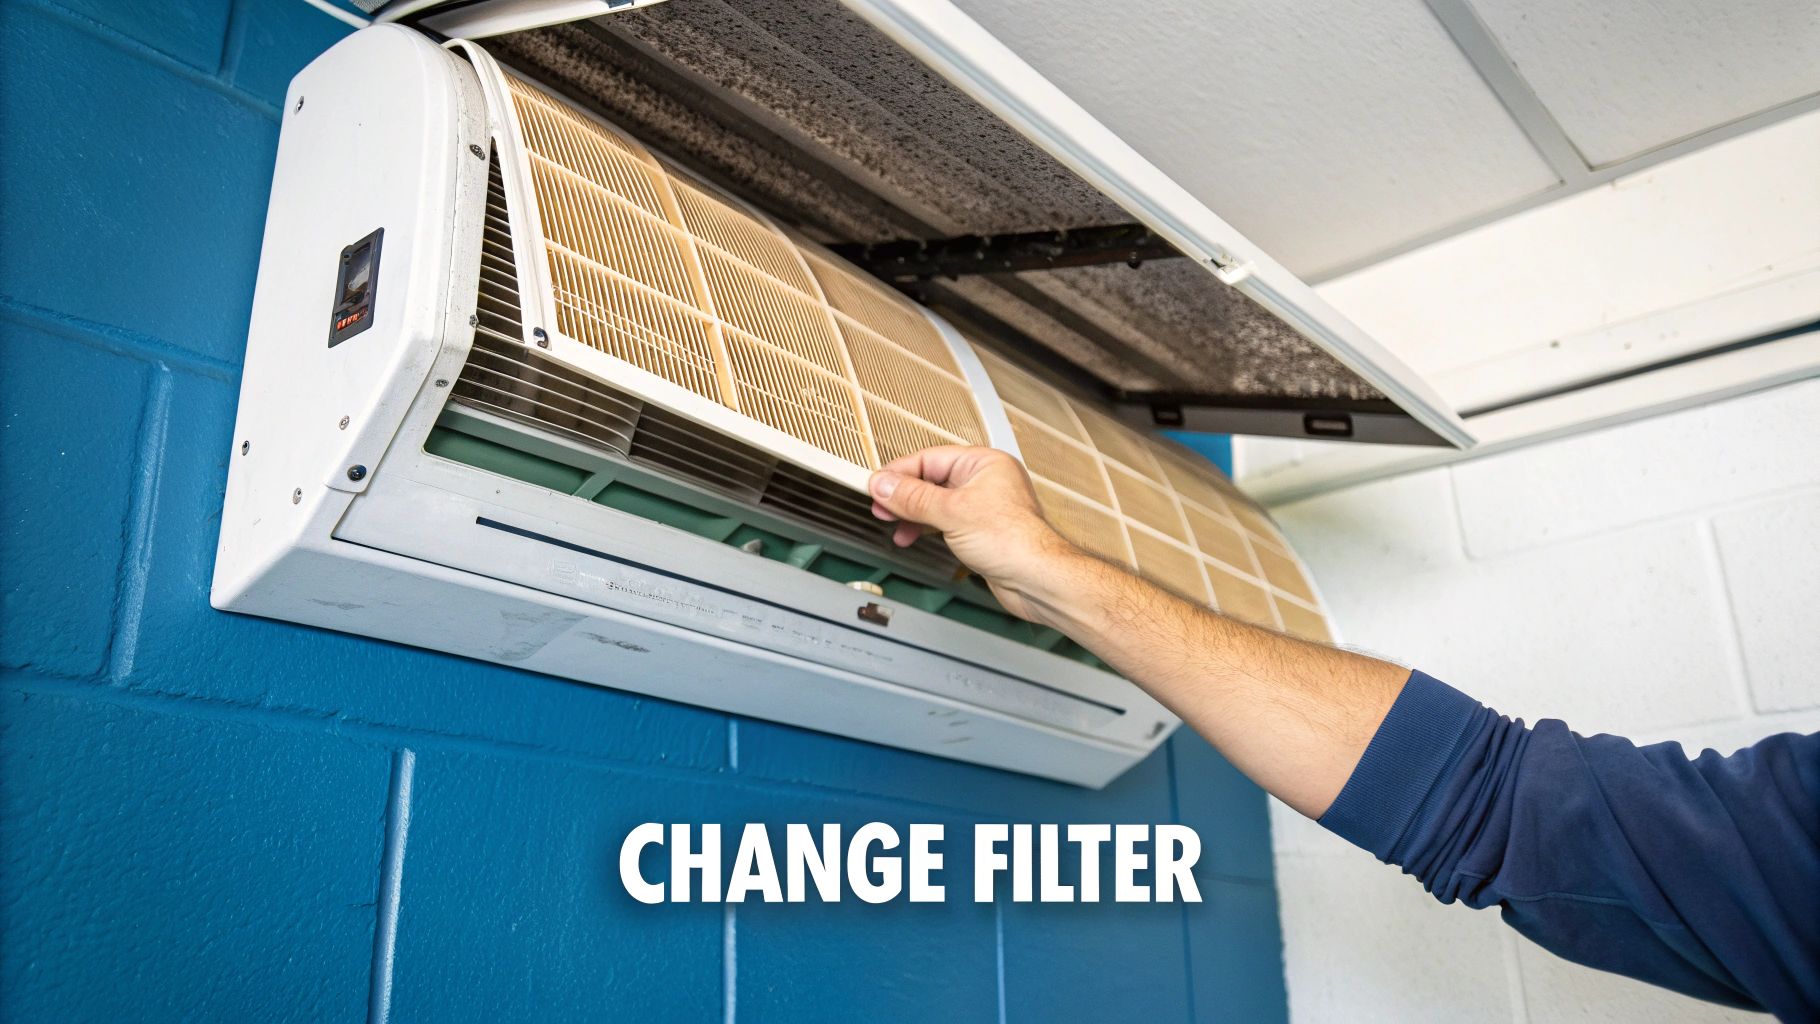
Inspect the Air Filter
If the thermostat and breaker are good to go, it's time to check the single most common cause of AC failure: a dirty air filter. I can't stress this enough. A clogged filter is like trying to breathe through a pillow—it suffocates your system.
When the filter is packed with dust and debris, it chokes off the airflow. This can cause the indoor evaporator coils to get too cold and literally freeze into a block of ice, stopping the cooling process dead in its tracks.
Find the filter slot in your indoor unit, slide the old one out, and hold it up to a light. Can't see the light? It's long past due for a change. Most filters need to be replaced every 1-3 months, depending on your home. If you'd like to learn more, you can read up on the different filters for air vents in your home. A fresh filter is a cheap and easy fix that can get your cool air flowing again.
Why Your AC Runs But Doesn't Cool
It's a classic Florida problem and one of the most maddening things to deal with as a homeowner. You can hear the air conditioner kick on, the fans are spinning, and you can feel air moving through the vents… but it’s not cold. Sometimes it's barely even cool.
When this happens, you’re almost always looking at a heat exchange problem. In simple terms, your AC has lost its ability to pull heat out of your home's air and dump it outside.
The first place I always tell people to check is the outdoor unit. That big, noisy box in your yard is the heart of the cooling operation. Its entire job is to release all the heat your system has collected from inside. If that unit can't breathe, your house isn't getting cool.
Take a Look at Your Outdoor Condenser Unit
Your outdoor unit needs a surprising amount of breathing room to work right. Things like overgrown bushes, piles of leaves, or even a patio chair set too close can choke off the airflow it desperately needs.
Start with a simple walk-around. Just a quick visual check can often solve the mystery. Look for obvious culprits:
- Plants and Weeds: Are your shrubs creeping in? Trim everything back so you have at least two feet of clear space on all sides. This is non-negotiable for proper airflow.
- Yard Debris: Clear away any leaves, grass clippings from the mower, or twigs that have collected around and on top of the unit.
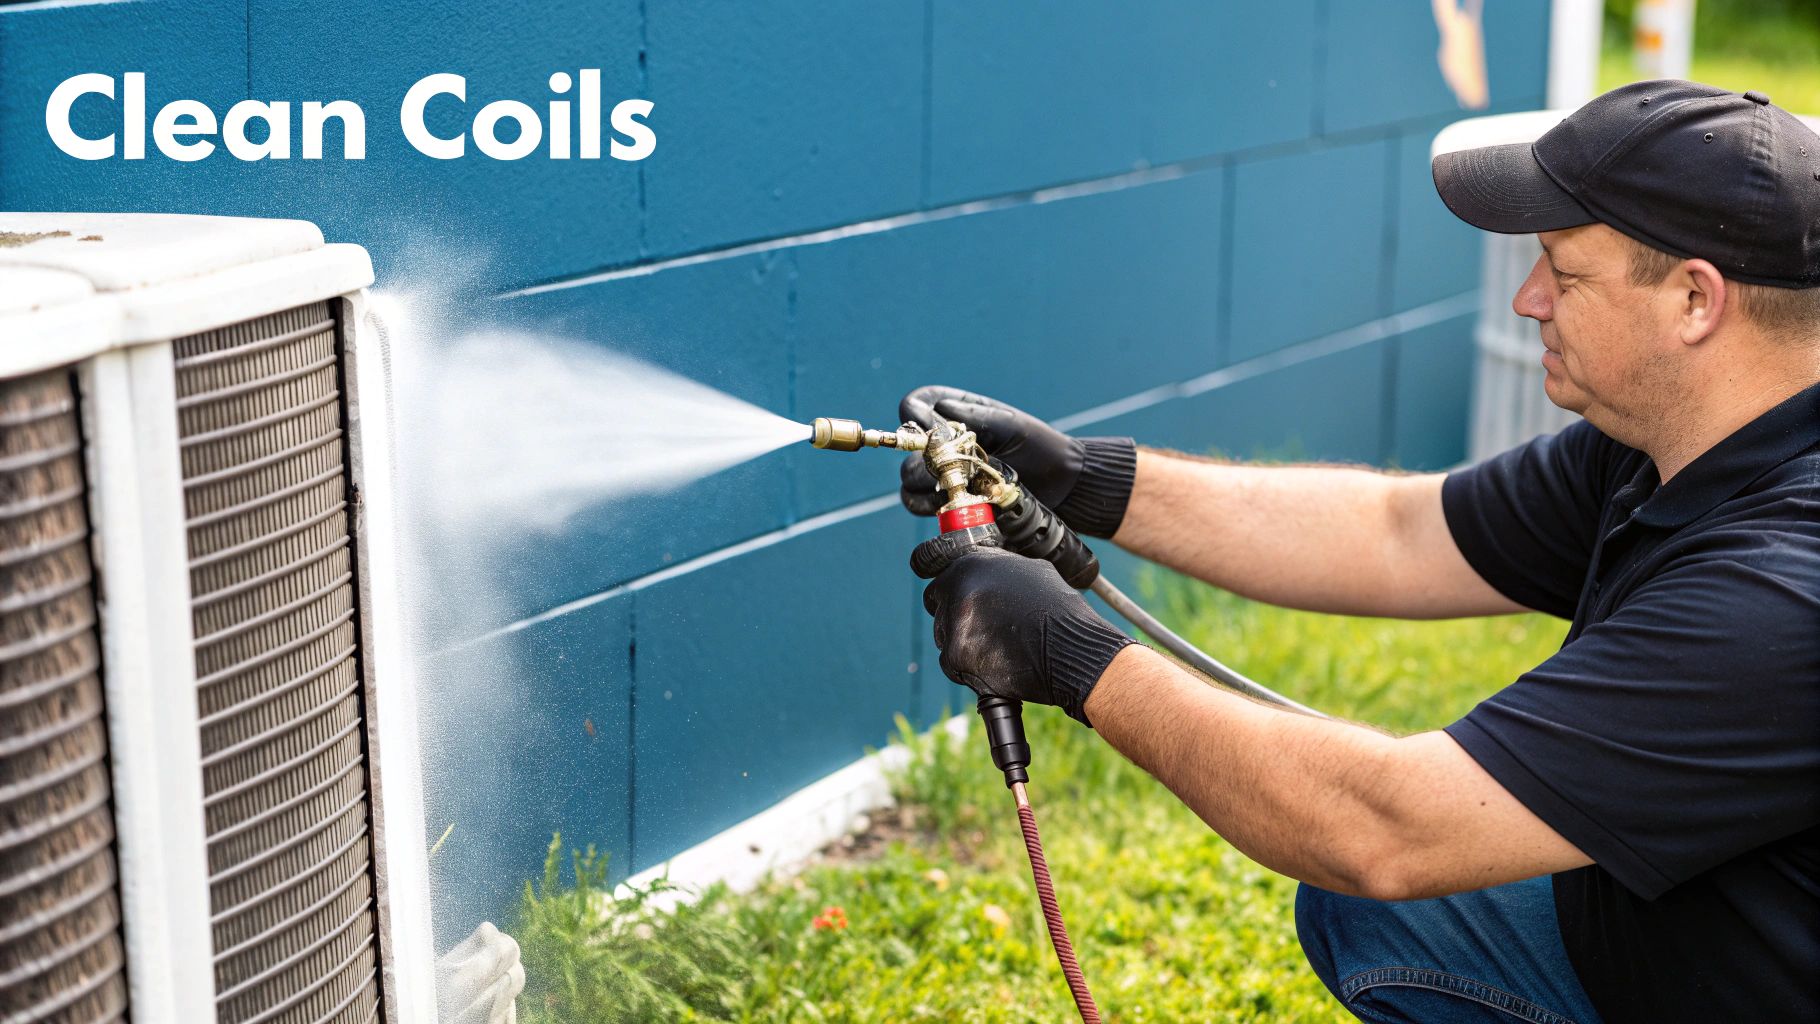
- Clogged Fins: Look closely at the delicate metal fins that wrap around the unit. If they're caked with a layer of dirt, dust, or that fluffy cottonwood stuff, they can't release heat.

Giving those coils a good cleaning is one of the most effective bits of maintenance you can do. If you want to tackle it yourself, we've put together a guide on how to clean your air conditioning coils that walks you through the process safely.
Spotting the Signs of a Refrigerant Leak
Okay, so you've cleared the area around the condenser and it's still blowing warm air. The next likely suspect is a refrigerant leak. Think of refrigerant as the lifeblood of your AC; it's the special compound that actually absorbs the heat inside your home.
If your system is low on refrigerant, its cooling power plummets. Here are a few tell-tale signs I’ve seen countless times:
- Ice on the Lines: Go look at the copper lines connected to your outdoor unit. If you see ice or frost on them—especially on a hot day—that's a dead giveaway for low refrigerant.
- Strange Noises: Can you hear a faint hissing or a bubbling sound near the unit? That could be the sound of refrigerant gas escaping.
- Cooling Gets Weaker: A slow leak won't happen all at once. You might notice that over a few days or weeks, your AC just can't seem to keep up like it used to.
A Quick Warning: Don't try to fix a refrigerant leak yourself. Refrigerant is a regulated chemical that requires special training and certified equipment to handle. If you think you have a leak, shut the system off completely to avoid damaging the compressor and call a professional right away.
Modern AC systems are incredibly complex, which is a big reason the HVAC services market is expected to reach a staggering $80.18 billion worldwide in 2024. As the technology gets more advanced, professional expertise becomes that much more important for homeowners.
So Your AC is Leaking Water? Here’s What to Do.
Seeing a puddle of water around your indoor AC unit can be alarming, but don't panic. In my experience, this is one of the most common service calls we get, and the fix is often surprisingly simple. The usual suspect is a clogged condensate drain line—that little PVC pipe designed to carry moisture safely outside. When it gets plugged up, the water has nowhere to go but all over your floor.
Let's walk through how to find and clear that clog yourself. Taking care of this quickly is important, because what starts as a small puddle can easily lead to serious water damage, mold, and a much bigger repair bill down the line.
Find and Clear That Clogged Condensate Line
First things first, you need to locate the drain line. Look for a white or gray PVC pipe connected to your indoor air handler. Then, follow it to where it exits your house, which is usually a small pipe sticking out of the ground or a wall near your outdoor condenser unit.
Got it? Great. Now for the easy part. The line is most likely blocked with a nasty mix of algae, sludge, and dirt. The best tool for this job is a standard wet/dry shop vacuum.
- Start by placing the vacuum's hose over the end of the drain line outside.
- You'll need a good seal, so use your other hand or a damp rag to wrap tightly around the connection point.
- Switch the vacuum on and let it run for a good 1-2 minutes. It's got to have enough suction to pull the gunk all the way through.
You'll often hear a satisfying "thump" or gurgling sound as the clog breaks free. Honestly, this one simple trick fixes the vast majority of leaking AC units I come across.
A Pro Tip From the Field: To keep this from happening again, pour a cup of distilled white vinegar down the condensate line every few months. Look for a T-shaped pipe with a cap near your indoor unit—that’s the access port. The vinegar works wonders at killing any algae or mold before it has a chance to build up.
When It's Not a Simple Clog
If you've cleared the line and your unit is still leaking, it's time to consider a few other possibilities. While a clogged drain is responsible for over 90% of AC leaks, a few other culprits can cause a watery mess.
Other Potential Leak Sources
| Problem Area | What to Look For | What to Do Next |
|---|---|---|
| Cracked Drain Pan | You see water dripping from the bottom of the indoor unit itself, not just the overflow pipe. You might also see visible rust or cracks in the pan beneath the coils. | This pan is what catches all the condensation. If it's damaged, it needs to be replaced. This is definitely a job for a professional. |
| Faulty Condensate Pump | If your AC is in a basement or attic, it probably has a small pump to get the water out. Check if its little reservoir tank is full but the pump isn't running. | First, make sure it’s plugged in and the float switch isn't stuck. If it still won't kick on, the pump has probably died and needs replacing. |
| Frozen Evaporator Coils | A solid block of ice on the indoor coils will eventually melt, creating far more water than the drain pan can handle. | This usually points to poor airflow from a dirty filter or low refrigerant. Try changing your air filter first. If the ice comes back, you’ll need to call a technician for service. |
Decoding Strange AC Noises and Odors
Your air conditioner is supposed to be one of those things you barely notice. It just hums along in the background, keeping you comfortable. So when it starts making a racket, it’s not just being annoying—it’s trying to tell you something is wrong.
Think of it like learning your AC's language. A high-pitched squeal means something completely different than a loud, metallic bang. Ignoring these sounds is a gamble that can turn a simple fix into a catastrophic system failure.
Translating Common AC Sounds
Let's run through the most common noises I hear about from homeowners and what they usually signal. Some are minor annoyances, while others are red flags you can't ignore.
-
Loud Banging or Clanking: This is one of the most serious sounds. It almost always means a major part, like a piston or connecting rod inside the compressor, has broken loose. It could also be a fan blade wildly smacking its housing. Whatever the cause, shut the system off immediately to prevent it from tearing itself apart.
-
High-Pitched Squealing: That piercing shriek often points to failing motor bearings or a worn-out belt. It’s the classic sound of metal grinding on metal, and if you let it go, you're risking a seized motor.
-
Persistent Clicking: A single click when the system kicks on or off is perfectly normal. But if you're hearing constant, repetitive clicking, that’s a different story. It often points to a failing electrical control or a faulty thermostat.
-
Rattling Noises: This is usually the least worrisome of the bunch. More often than not, it's caused by something simple like loose screws on a panel, some leaves and twigs in the outdoor unit, or even just an improperly seated filter. A quick visual inspection can often solve this one.
A buzzing or humming sound that just won't quit, especially when the fan isn't spinning, usually means there’s an electrical issue. It’s often a bad capacitor or a struggling motor, and that’s a job for a pro.
Identifying Unpleasant AC Odors
Your nose is just as important as your ears when it comes to diagnosing AC problems. A strange smell wafting from your vents is a clear sign that something needs your attention—and fast.
The two most common culprits are musty smells and burning smells, and they point to very different issues.
Recognizing Concerning Smells
| Odor Type | Likely Cause | Action Required |
|---|---|---|
| Musty or "Dirty Sock" Smell | This is the classic signature of mold or mildew growing on the damp evaporator coils or sitting in the drain pan. | Schedule a professional cleaning and tune-up. They have the right tools to safely clean the coils. |
| Burnt or Electrical Smell | The smell of hot plastic or ozone points to overheating wires, a fried circuit board, or a failing motor. | This is a serious fire hazard. Shut off the power to the AC unit at the circuit breaker and call an HVAC pro right away. |
| Rotten Egg or Sulfur Smell | This is the most dangerous one. It doesn't come from the AC itself but could mean you have a natural gas leak somewhere near your ductwork. | Get everyone out of the house immediately. From a safe distance, call your gas company, then an HVAC technician. |
Getting these problems fixed is, unfortunately, getting tougher. The HVAC industry is facing a massive labor shortage, with an estimated 110,000 technician jobs expected to be unfilled by 2025. This means you might be waiting longer for a service call.
You can read more about this growing trend on Workyard.com. By running through a basic air conditioning troubleshooting guide check yourself first, you can give the technician a clear description of the problem, which can help them diagnose and fix it much faster when they arrive.
Knowing When to Call an HVAC Professional
While this guide can help you tackle a lot of common AC hiccups, the smartest homeowners know where to draw the line. Getting in over your head with a complex repair isn't just a risk to your air conditioner—it can be downright dangerous. Knowing when to put the tools down and pick up the phone is a skill in itself.
Some problems are clear signals that it's time to call in the pros. These are the issues that involve safety risks or require specialized equipment. Trying to fix them yourself can quickly turn a manageable problem into a catastrophic failure, complete with a hefty bill.
Red Flags That Mean "Call a Pro, Now"
If you notice any of these symptoms, your first move should be to shut the system off at the breaker. Your next should be calling a certified technician. Don't wait.
- You Suspect a Refrigerant Leak: See ice forming on the copper lines outside? Hear a strange hissing or bubbling noise? Those are classic signs of a refrigerant leak. Refrigerant is a hazardous material, and only licensed professionals are legally allowed to handle it.
- The Breaker Keeps Tripping: It's one thing if a breaker trips once. But if you reset it and it trips again shortly after, you have a serious electrical problem. This could be a short circuit or a failing compressor, both of which are significant fire hazards.
- The Compressor is Dead Silent: When your AC is on, you should hear the indoor fan blowing and the outdoor unit humming along. If the inside is running but the outside is quiet, your compressor has likely failed. That’s the heart of your system, and it's a complex and expensive component that's not a DIY job.
Spotting these critical issues early can save you a world of trouble. These aren't just minor quirks; they point to bigger problems brewing within your system. For a closer look, we break down the top signs your AC needs repair.
How to Find a Technician You Can Trust
When it's time to call for backup, you can't just pick any name out of a hat. You need someone with the right credentials, a solid reputation, and transparent pricing.
I always tell people to start local. Ask neighbors for recommendations on social media or check trusted review sites. Once you’ve got a shortlist, vet them thoroughly before you let them start any work.
Key Questions to Ask Before Hiring:
- Are you licensed and insured to work here in Florida?
- Will you provide a detailed, itemized quote in writing before you start?
- What kind of warranty do you offer on parts and your labor?
- How do you charge for the initial visit—is it a flat diagnostic fee or by the hour?
Any reputable pro will have no problem answering these questions. Their quote should clearly break down the cost of parts, labor, and any other charges, so you know exactly what you’re paying for.
With the air conditioning market booming—Asia-Pacific alone saw over 115.8 million units sold in 2020—finding a good tech is more important than ever. You can learn more about the global AC market on thechillbrothers.com.
Quick Answers to Common AC Questions
Even after running through the usual troubleshooting steps, you might still have some nagging questions. Is what I'm seeing normal? Is this a sign of something serious? I get these kinds of questions all the time from homeowners, so let's tackle a few of the most frequent ones.
This is your go-to spot for quick, clear answers. The idea is to help you figure out what's going on so you can decide whether it's a quick fix you can handle or if it’s time to call in a pro.
Why Does My AC Run Constantly?
An air conditioner that never shuts off is a major red flag. Your system is designed to run in cycles—kicking on to cool your home to the set temperature, then shutting off until it's needed again. If yours just keeps going and going, something's definitely wrong.
Not only is a constantly running AC driving up your energy bill, but it's also putting a ton of wear and tear on the equipment. Here are the usual suspects:
- Dirty Parts: A clogged air filter or grimy condenser coils are the most common culprits. When airflow is blocked or the unit can't release heat effectively, it has to work overtime just to keep up.
- Low Refrigerant: If your system has a refrigerant leak, it has lost its ability to cool. It will run forever, trying to achieve a temperature it simply can't reach anymore.
- Wrong Size Unit: An AC that's too small for your house will fight a losing battle on hot days. It was never equipped to handle the space, so it runs continuously without ever catching up.
A constantly running AC is never normal. If you've already tried a fresh filter and hosing down the outdoor unit, you're likely dealing with a bigger problem like a refrigerant leak. That requires a professional.
How Often Should I Really Change My Air Filter?
This is probably the number one question I get, and the honest answer is, it's different for everyone. That generic "every three months" advice you hear is just a baseline. The reality depends entirely on your home.
For instance, if you live alone and keep a tidy house, you can probably get away with changing the filter every 90 days. But if you've got a family with a couple of dogs and someone has allergies, you should be checking that filter every 30 to 45 days. Think of a clean filter as the cheapest and easiest way to protect your HVAC system's health.
Is It Normal for My AC Vents to Sweat?
Seeing condensation dripping from your AC vents can look pretty scary, but it’s often just a simple science problem. It happens when the frigid air blowing out of your vents collides with the warm, humid air inside your room.
This is especially common in sticky, humid climates. A little moisture now and then isn't a catastrophe, but if your vents are constantly dripping, it could signal a deeper issue.
Why Vents Sweat and What to Do
| The Cause | What's Happening | The Fix |
|---|---|---|
| High Indoor Humidity | There's just too much moisture in your home's air, making the temperature contrast more extreme. | Run a dehumidifier. Also, check for drafts or air leaks around your windows and doors. |
| Poor Airflow | A clogged filter or blocked ducts can cause the air to become extra cold by the time it reaches the vent. | Start with a new air filter. Make sure all your vents are open and not blocked by furniture. |
| Poor Duct Insulation | The ductwork running through your hot attic or walls might not be insulated properly. | This is a more involved fix. You'll likely need a pro to add or repair the insulation around your ducts. |
If you've tackled the humidity and airflow issues but your vents are still sweating, it's a good idea to have a technician check out your ductwork. Over time, that constant moisture can lead to water stains, damaged drywall, and even mold.
Don't let AC troubles ruin your comfort. If you're facing an issue you can't solve, the experienced team at Florida Cooling Group is here to help 24/7. For fast, reliable, and professional service in Palm Beach County, schedule your repair online today.
Charlie Hadida is a senior HVAC technician and the SEO lead at Florida Cooling Group, with years of real-world experience diagnosing, repairing, and installing residential and commercial HVAC systems throughout Palm Beach and Broward County.
Unlike generic marketing content, Charlie’s work is grounded in on-site service experience — from troubleshooting electrical and airflow issues to overseeing full system replacements, crane lifts, and code-compliant installations. His technical background allows him to translate complex HVAC concepts into clear, accurate, and helpful information for homeowners, property managers, and business owners.
In addition to working in the field, Charlie leads Florida Cooling Group’s SEO and content strategy, ensuring that all service pages, guides, and educational resources reflect real conditions technicians encounter every day. This includes topics such as AC repair, preventive maintenance, system replacements, energy efficiency, permitting requirements, and South Florida–specific climate challenges.
Charlie plays an active role in shaping Florida Cooling Group’s service standards, maintenance programs, and long-term customer education efforts. His combined technical and SEO expertise helps bridge the gap between what customers search for online and what actually matters when servicing HVAC systems in Florida’s demanding environment.
Licensed HVAC Technician (Florida)
Residential & commercial HVAC experience
Hands-on system diagnostics, repairs, and installations
Experience with rooftop units, split systems, and package units
Local experience serving Palm Beach & Broward County
Areas of Expertise:
AC Repair & Troubleshooting
Preventive Maintenance & Service Agreements
HVAC System Replacements & Change-Outs
Commercial HVAC Systems
South Florida HVAC Codes & Permitting